Positioning: Mount Control Prerequisites
The officer has successfully taken the suspect to ground and established mount position. Before proceeding with handcuffing techniques, officers should review foundational mount control methods to maintain dominant positioning throughout the arrest sequence.
Tactical Priority: Weapon-Side Arm Control
The officer's primary objective is controlling the suspect's arm on the same side as their duty weapon. This prevents the suspect from accessing the firearm during the vulnerable handcuffing process.
Striking Method: Open-Hand Slaps Over Closed Fists
Officers should use deliberate open-hand slaps to the face rather than closed-fist strikes for two critical reasons: to minimize excessive force liability during potential video documentation and to preserve hand integrity for weapon deployment and continued control. Open-hand strikes achieve the same defensive response—raising the suspect's hands to protect their face—without these risks.
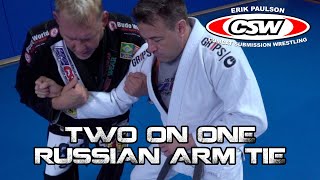
Two-on-One Control and Arm Draping
The officer secures both hands around the suspect's weapon-side arm, steps up with the opposite leg, and drapes the suspect's arm over their thigh. The officer then consolidates control by pinning the tricep with their hand, creating a mechanical lock that prevents escape regardless of the suspect's strength.
Transitioning to Prone Position with Verbal Commands
While maintaining tricep control, the officer applies shoulder pressure by bringing the suspect's wrist toward their hips, signaling a roll to prone position. The officer must step out slightly with the base leg to allow the suspect room to comply with clear verbal commands.
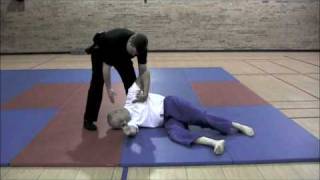
Lower Back Control and Knee Block
Once the suspect is prone, the officer maintains control across the lower back—avoiding high positioning that causes excessive pain and resistance. The officer then switches leg position, placing their knee to block the suspect's tricep, creating an immovable anatomical barrier.
First Cuff Application with Wrist Lock
The officer applies a subtle wrist lock for enhanced control while accessing and deploying handcuffs on the first wrist. Once the first cuff is secured, it becomes an additional control point for managing the suspect during the second cuff application.
Second Arm Retrieval: Verbal Commands and Positioning
Rather than reaching forward to grab the second arm—risking injury from strikes—the officer issues clear verbal commands directing the suspect to extend their arm to the side, palm upward, then slowly return it. The officer maintains a safe distance while waiting for compliance before securing the second cuff.
Secondary Inspection: Detecting Concealed Weapons
Before the suspect retrieves their second hand, the officer commands them to extend the arm and open their palm upward. This visibility check reveals whether the suspect is holding a weapon or contraband, critical intelligence before allowing the hand to return toward the officer's position.
Size Disparity Considerations: Chest Pressure Augmentation
When facing larger or stronger suspects, smaller officers can increase control by applying their full body weight across the suspect's elbow and arm. This chest-to-elbow pressure compensates for strength differentials and prevents escape attempts during the transition to prone positioning.
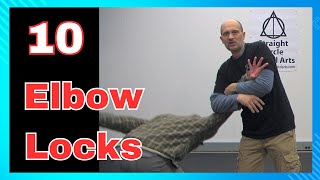
BJJ for Law Enforcement - Handcuffing From The Mount
Key Takeaways
- •Positioning: Mount Control Prerequisites
- •Tactical Priority: Weapon-Side Arm Control
- •Striking Method: Open-Hand Slaps Over Closed Fists
- •Two-on-One Control and Arm Draping
During an arrest, there is no referee to start or to stop the fight, there are no weight classes, no time limits, and no rules in place to protect you should things go bad. Only the bad guy knows if, when and how he will attack. Any time you are close enough to conduct a suspect interview, a pat-down, or document exchange you are close enough to be ambushed and assaulted. This ambush often times will start with the SUCKER PUNCH. Master this simple and effective defensive tactic to neutralize the threat ,achieve the advantage, and apprehend the assailant all while minimizing injury to yourself and the perpetrator! -------------------------------------------------------------------------------------------------------- Gracie NEPA was first established in 2005. Since then, Jeff Reese and his talented assistants have been relentlessly working to educate students in the art of Gracie Brazilian Jiu-Jitsu. Gracie NEPA headquarters is located in Scranton but it’s influence has spread across Pennsylvania as assistants and students have opened schools of their own. For more information call: 570-963-9739 or visit us on the web at http://www.gracienepa.com To enjoy more video be sure to visit and subscribe to us at: youtube.com/channel/UCj9-QA8g9Xj_iIEojgC0gAQ https://youtu.be/EmDVsX8uUtQ
Related Techniques
Frequently Asked Questions
What does this video teach about from prone control?
This video covers positioning: mount control prerequisites, tactical priority: weapon-side arm control, striking method: open-hand slaps over closed fists. It provides detailed instruction from Gracie NEPA.
How long does it take to learn from prone control?
The basic mechanics can be understood in a single session, but developing reliable execution requires consistent drilling over weeks of practice. This 10-part breakdown helps structure your training by isolating each phase of the technique.
What are the key details for finishing from prone control?
Before the suspect retrieves their second hand, the officer commands them to extend the arm and open their palm upward. This visibility check reveals whether the suspect is holding a weapon or contraband, critical intelligence before allowing the hand to return toward the officer's position.