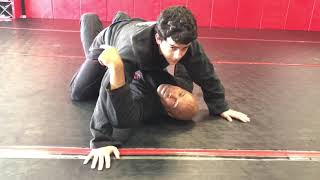
Establishing Hand Control
The practitioner initiates the escape by securing the opponent's hand on the mat. Rather than gripping with finger strength alone, the defender clasps both hands together to control through grip integrity, which proves more effective against larger opponents with significant arm mass.
Avoiding Common Mistakes
Pulling the hand backward without proper positioning is ineffective and exposes the defender to an armlock. The defender must maintain a forward orientation and keep the opponent compressed downward to prevent them from establishing offensive submissions.
Timing the Bridge and Pull
The escape relies on synchronized timing between the hip bridge and hand control. The defender initiates the bridge upward, captures the opponent's hand during this motion, and executes the pull downward as the hips descend—creating continuous momentum rather than sequential movements.
Predicting Hand Movement
The defender's hips guide the opponent's weight distribution, making their hand position predictable. By understanding the direction of the bridge, the defender can position their hands to intercept the opponent's hand before it relocates, maintaining control throughout the escape.
Head Positioning for Leverage
The defender moves their head to look into the mat while keeping their chin directly underneath the opponent's chin. This positioning creates mechanical advantage for the sweep and prevents the opponent from shifting weight laterally, which would negate the escape entirely.
Complete Sequence Execution
The full escape follows a three-phase rhythm: bridge up, pull down, bridge up again. This creates the momentum necessary to dislodge the opponent and complete the sweep in one fluid motion when performed at speed.
BJJ Breakdown: How to Do the Buck and Roll Escape from Mount
Key Takeaways
- •Establishing Hand Control
- •Avoiding Common Mistakes
- •Timing the Bridge and Pull
- •Predicting Hand Movement
http://www.infighting.ca/index.php Vancouver BJJ instructor shows how to escape bottom mount by seizing the arm and executing a buck and roll escape. The buck and roll escape from bottom mount is one of the fundamental escapes that all bjj practitioners should have in their arsenal.
Frequently Asked Questions
What does this video teach about standard roll escape?
This video covers establishing hand control, avoiding common mistakes, timing the bridge and pull. It provides detailed instruction from Ritchie Yip.
How long does it take to learn standard roll escape?
The basic mechanics can be understood in a single session, but developing reliable execution requires consistent drilling over weeks of practice. This 6-part breakdown helps structure your training by isolating each phase of the technique.
What are the key details for finishing standard roll escape?
The defender moves their head to look into the mat while keeping their chin directly underneath the opponent's chin. This positioning creates mechanical advantage for the sweep and prevents the opponent from shifting weight laterally, which would negate the escape entirely.