Technique Tuesday | How to Clinch WITHOUT Being Thrown
0
Standard Wall Pin Position·Bangtao Muay Thai & MMA
#mma #wrestling #technique Technique Tuesday 🥊 Learn how to dominate the Muay Thai clinch without getting thrown at B…
Translation: standard wall pin position
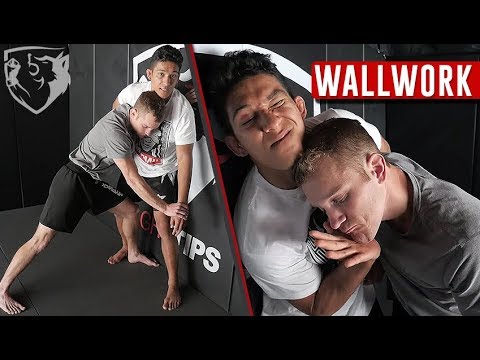
The Standard Wall Pin Position places the attacker's body against the opponent with the opponent's back flat against the cage, using a combination of chest pressure, underhooks or body lock, and low hip positioning to maintain the pin. [1] The attacker keeps their feet wide for base, drives the hips into the opponent's midsection, and uses the clinch grip to prevent the opponent from creating space or sliding along the fence. [1],[2] Effective wall pinning requires constant pressure adjustment as the opponent attempts to circle, pummel, or create frames to escape. [2],[3]
The standard wall pin uses chest pressure and underhook or body lock control to keep the opponent flat against the cage, draining their energy and preventing offensive action. [1] Couture identifies wall pinning as a critical energy management strategy in MMA, noting that the fighter pressing against the cage expends significantly less energy than the fighter being pressed. [1]
Standard wall pin position technique developed for MMA cage fighting. [1]
The standard wall pin position is a foundational cage control technique taught in all MMA gyms and used at every level of competition. [1]
No images yet for this technique.
Sign in to suggest an image.
#mma #wrestling #technique Technique Tuesday 🥊 Learn how to dominate the Muay Thai clinch without getting thrown at B…
Fighting off the wall or cage is an art in itself, with very specific techniques that utilize leverage and control. 'The…
Learn the basics of clinch fighting, specifically the grips. Clinch fighting (or dirty boxing, as it is sometimes called…
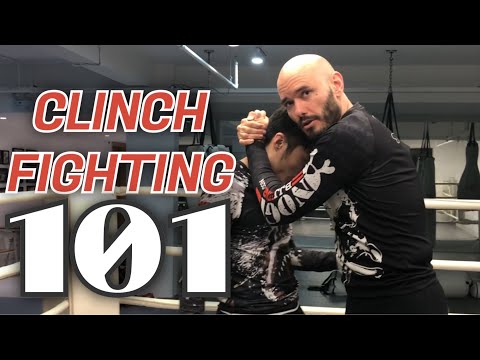
The standard wall pin position is a dominant clinch configuration where one fighter controls an opponent against the cage through coordinated upper-body pressure and positioning. All three instructors emphasize that effective wall pinning requires controlling three key zones: the opponent's head, hands, and hips. Ramsey Dewey stresses the importance of closing distance by bringing the shoulder into the opponent's head rather than pulling them toward you, keeping the head close to minimize striking opportunities. fightTIPS (Vince and Shane) elaborate that head control is achieved by lifting upward against the opponent's head, which elevates them onto their toes and restricts movement; this is often paired with underhook control of the arms—ideally bilateral underhooks gripped around the back for maximum stability, though single underhooks are also viable. Bangtao Muay Thai & MMA (Che) adds that shoulder positioning is critical: the controlling fighter's shoulder must remain below the opponent's shoulder line to access leg-attack options and maintain mechanical advantage. All instructors agree that hand control (via wrist grips or arm control) and hip isolation (achieved through low, wide stance work and knee pressure against the cage) complete the control triangle. The defending fighter must actively battle all three zones simultaneously—getting the head up, clearing trapped hands, and repositioning hips underneath the body to escape. The position serves as a base from which dominant fighters can execute strikes, set up takedowns, or work toward submissions, making it a cornerstone of cage fighting fundamentals.
Synthesized from 3 instructors
No instructional courses yet for this technique.
Sign in to suggest a course.
Risk of injury to the person this technique is applied to
Cage clinch work involves grinding pressure; rib/facial abrasion risk
Skill level needed to execute this technique reliably
Whether this technique is allowed under major competition rule sets
Mastering Jujitsu (Renzo Gracie & John Danaher, 2003)
Alias sources — [1] Clinch Fighting for MMA (Couture, 2011) [2] Wrestling for Fighting (Velasquez, 2012) [3] MMA Instruction Manual (UFC, 2008)
Effectiveness sources — [1] Clinch Fighting for MMA (Couture, 2011)
Standard katakana transliteration of Western martial arts terminology (外来語) — used in Japanese MMA, boxing, and BJJ communities
Alias sources — [1] Clinch Fighting for MMA (Couture, 2011) [2] Wrestling for Fighting (Velasquez, 2012) [3] MMA Instruction Manual (UFC, 2008)
Effectiveness sources — [1] Clinch Fighting for MMA (Couture, 2011)
swimming speed for inside position, shoulder drive, hip pressure
strong shoulders and low centre of gravity
deltoids, pectorals, core, quadriceps
Keep your head very close to your opponent's head rather than extended outward. According to fightTIPS, good head pressure involves pushing your head in to control their chin and clear space, which allows you to move around and eventually escape the cage even if they have underhooks.
Place one palm over the other without interlacing your fingers, like a palm-fist salute. Ramsey Dewey emphasizes that when you grab the collar tie, you should pull yourself into your opponent by bringing your shoulder into their head rather than trying to pull their head into your shoulder.
If your opponent controls your wrist, bring your knee up while keeping your hips centered underneath you, then lift up to break the grip. fightTIPS notes you can then work to establish an underhook or create enough space to shoot your hips away from the cage.
Focus on controlling your opponent's head, hands, and hips while changing levels. fightTIPS explains that controlling the head is critical—if you control their chin and get your head in the right position, you can clear space and maintain mobility even under pressure.
The Standard Wall Pin Position places the attacker's body against the opponent with the opponent's back flat against the cage, using a combination of chest pressure, underhooks or body lock, and low hip positioning to maintain the pin. The attacker keeps their feet wide for base, drives the hips into the opponent's midsection, and uses the clinch grip to prevent the opponent from creating space or sliding along the fence.
The standard wall pin position is a product of MMA's cage wrestling evolution, refined through thousands of fights and training sessions into a systematic control method. Coaches developed specific drills and positional hierarchies for wall pin maintenance and offence.
Unified MMA: legal — Legal — clinching is integral to MMA; IJF: legal — Legal — kumi-kata (grip fighting) is fundamental to judo; IBJJF: legal — Legal — standing grip fighting and clinch work permitted; IFMA: legal — Legal — the clinch is a core element of Muay Thai, clinch dominance is highly…; WBC/Boxing: restricted — Holding is technically a foul — referee breaks clinch, excessive holding resu…; K: restricted — 1/GLORY — One attack from clinch allowed, then referee breaks; WAKO: restricted — Clinch generally broken by referee — limited or no clinch fighting in most fo…; UWW: legal — Legal — clinch is fundamental to wrestling, the primary position in Greco-Roman
Danger rating 4/10. Moderate — cage clinch work involves grinding pressure; rib/facial abrasion risk
The standard setup chain: Close Distance → Establish Primary Grip → Position the Hips → Apply Pressure.
Standard counters include: Pummeling — fight for inside position by swimming arms under opponent's grips / Frame and Push — create distance using forearm frames against the chest or neck / Grip Break — systematically strip the opponent's controlling grips / Posture Up — straighten the spine and drive the hips forward to break clinch control.
Common variants: Single underhook (one arm inside for angle and control); Double underhooks (both arms inside for maximum inside position); Underhook with collar tie (combining the underhook with head control).
The standard wall pin position is a foundational cage control technique taught in all MMA gyms and used at every level of competition.
Top errors to watch for: Standing square with both feet at the same distance from the cage — stagger the feet for better base and driving ability / Not maintaining constant forward pressure — any gap allows the opponent to frame or spin / Keeping both hands in clinch without attacking — use at least one hand for offence (strikes or position changes) / Putting your head in the centre (face-to-face) — head to one side for safety and visibility.
The Standard Wall Pin Position is also known as Wōru Pin Pojishon (Kihon-gata), Basic Wall Pin Position, Standard Cage Pin Stance, Fence Pin Position.